What is Tagged Knowledge?
Tagged Knowledge is a powerful feature in Assist 2.0 that allows you to organize and control what information your AI uses across different projects. Instead of uploading the same documents repeatedly for each project, you upload them once at the Workspace level, assign descriptive tags, and then activate those tags in any project that needs them.
This ensures your AI has the right context exactly where it's needed — without information overload or manual file management. In Assist 2.0, when you start a chat inside a project, the AI will automatically look up the knowledge available to that project before doing any work, so well-tagged knowledge pays off immediately.
Why Use Tagged Knowledge?
Upload Once, Use Everywhere
- Upload documents like brand guidelines, legal disclaimers, or product specs to your Workspace Knowledge library
- Tag them with clear, descriptive labels
- Activate those tags in any project with a single click
Key Benefits
- Organize at scale: Group related documents under a single tag (e.g.,
brand-guidelines,legal,product-specs) - Control what AI sees: Activate only the relevant knowledge for each project to avoid confusion
- Save time: No more re-uploading the same files across multiple projects
- Maintain consistency: All projects using a tag reference the exact same source material
- Automatic updates: Update a document once, and it applies to all projects using that tag
- Picked up automatically by chat: When you start a chat in a project, Assist 2.0 will check the project's activated knowledge as part of its setup — no need to manually attach files each time
How Tagged Knowledge Works
Tagged Knowledge operates on two levels:
1. Workspace Level (Upload & Tag)
This is where you upload and organize your foundational knowledge. Documents uploaded here are available to be used across any project in your workspace.
Note on scope: Knowledge is scoped to the workspace it lives in. There is no org-level knowledge sharing across workspaces — if you need the same document in another workspace, upload it there too.
2. Project Level (Activate)
This is where you selectively activate the tags you need. Only the knowledge with activated tags will be available to the AI, agents, outputs, and chats within that specific project.
Step-by-Step Guide
Part 1: Adding Knowledge to Your Workspace
Step 1: Navigate to Workspace Knowledge
- Open your workspace from the left navigation panel
- Click on Workspace Knowledge in the left sidebar
- If this is your first time, you'll see a message prompting you to add your first knowledge item
Step 2: Upload Your Document
-
Click the Add Knowledge button (top-right corner)
Select Upload File from the dropdown menu
-
Other options include: From Text, Scan Url, Upload Image
Choose your upload source:
- My Device (local files)
- Box, Dropbox, OneDrive, Google Drive (cloud storage)
-
- Select your document and click Open
- Wait for the upload to complete (you'll see: Uploading → Processing → Upload complete)
- Click Done
Supported file formats: .md , .pdf , .txt , .docx
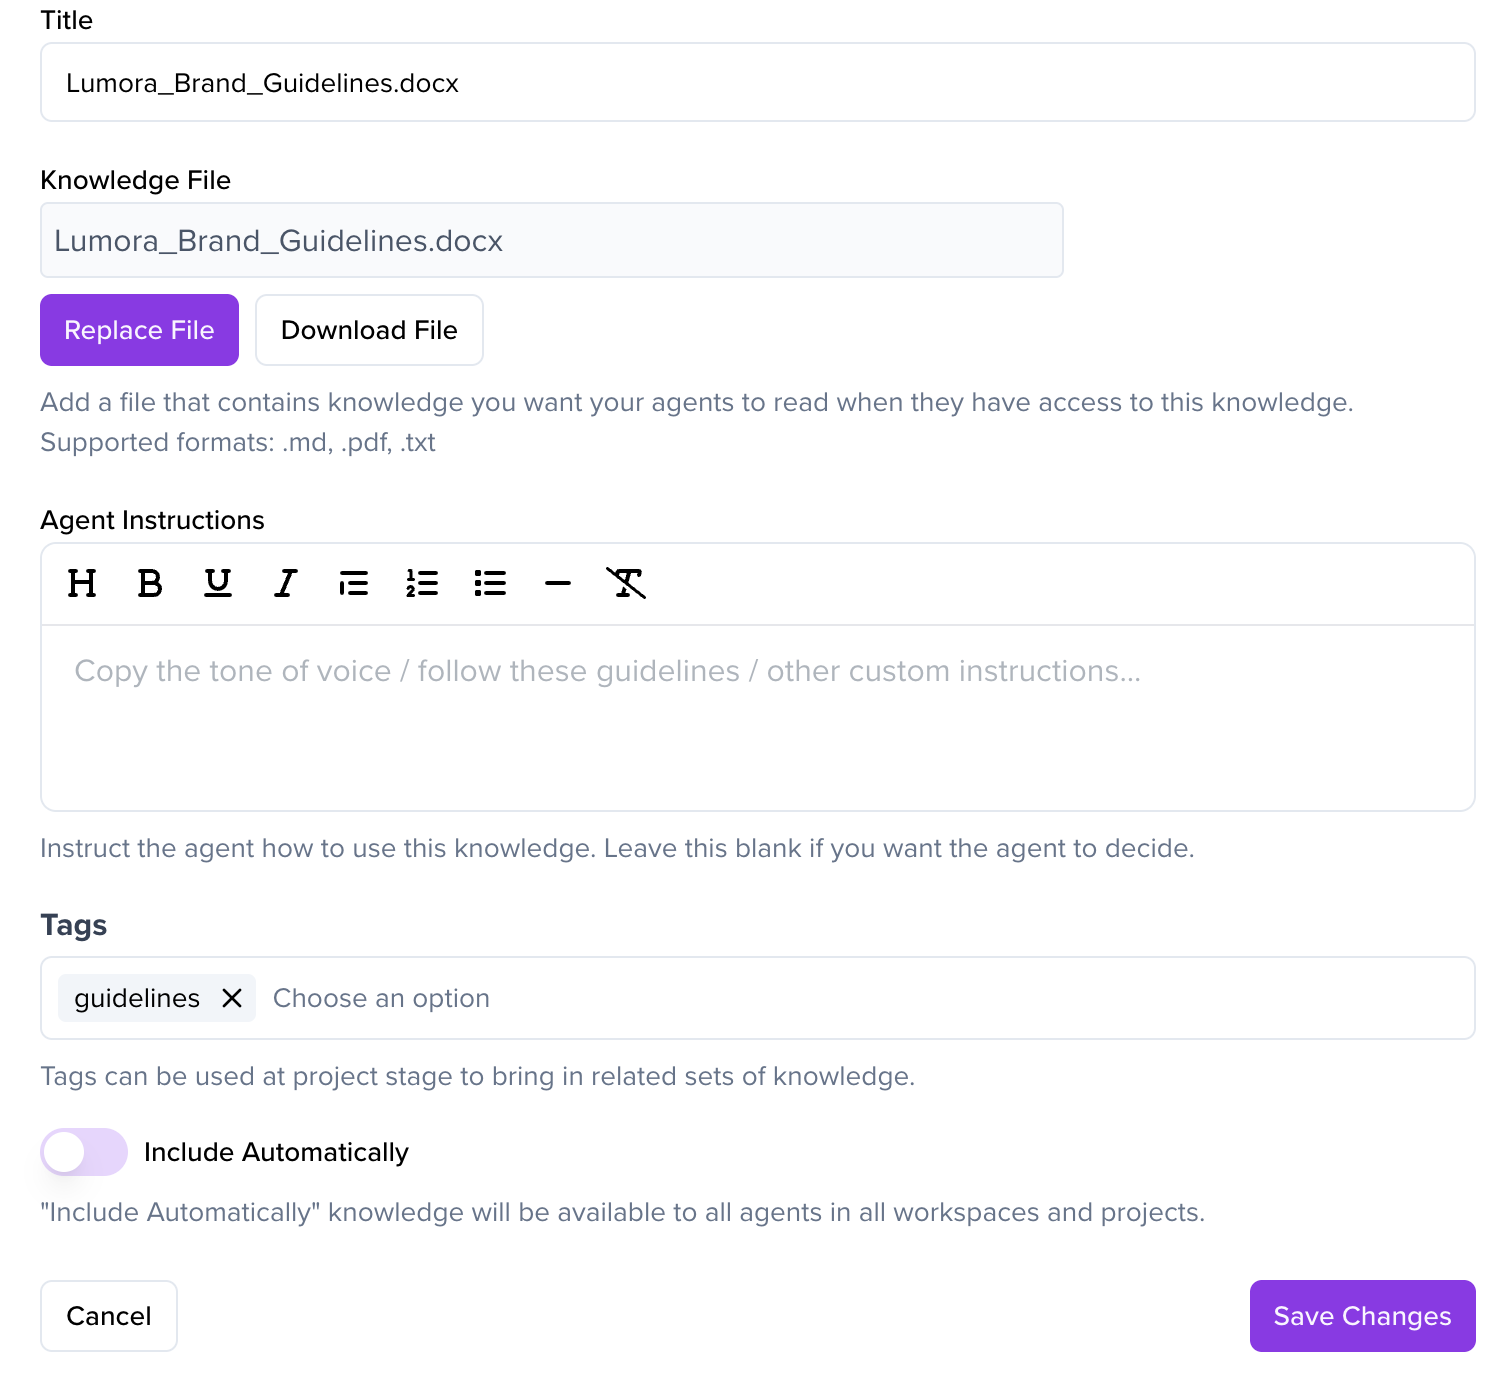
Step 3: Add Metadata
-
Title: Enter a memorable name for this knowledge (e.g., "Brand Guidelines")
Tags: Click the Tags field and either:
- Type a new tag name (e.g.,
brand-guidelines) - Select an existing tag from the suggestions
-
You can add multiple tags separated by commas
Agent Instructions (Optional): Add guidance for how the AI should use this knowledge
- Example: "Use this to ensure all outputs match our brand tone and messaging guidelines"
- Type a new tag name (e.g.,
- Include Automatically (Optional): Toggle this ON if you want this knowledge available to all agents in all projects within the workspace by default
-

Step 4: Save
- Click Save Knowledge
- You'll see a green success notification: Knowledge saved successfully
- Your document will appear in the Workspace Knowledge list with status Training in Progress

Part 2: Activating Knowledge in a Project
Step 1: Open Your Project
- Navigate to the project where you want to use the tagged knowledge
- Ensure you're in the correct workspace
Step 2: Access Project Knowledge Settings
-
Click the Project Knowledge button in the project view
A modal will open showing:
- Organisation & Workspace Knowledge section
- Knowledge Tags section
Step 3: Select Your Tags
- Click the Knowledge Tags input field
-
A dropdown will appear showing all available tags from your Workspace Knowledge
Select the tag(s) you want to activate (e.g.,
brand-guidelines)- You can select multiple tags
- Only select the tags relevant to this specific project
- Click Save
Step 4: Confirmation
You'll see a green success notification: Project knowledge saved successfully. The knowledge is now active in this project.
What happens next:
- All documents with the activated tags are now automatically available to the AI
- Every output, agent, and chat in this project will reference this knowledge
- When you start a new chat in the project, Assist 2.0 will check the project's activated knowledge as part of its initial setup before planning or executing work
- No need to manually attach documents or re-upload files
Part 3 (Optional): Adding Knowledge From Inside a Chat
In Assist 2.0, you can also add knowledge directly from a chat — useful when you're already mid-task and realise the AI needs more context.
- Upload a file or paste a URL into the chat
- Ask the AI to save it as knowledge, or to use it when creating an agent or template
- The AI will attach the knowledge to the relevant asset as it builds it
This is great for one-off context. For anything you want to reuse across projects, upload it properly via Workspace Knowledge and tag it.
Managing Your Tagged Knowledge
Updating Knowledge
To update a document:
- Go to Workspace Knowledge
- Find the document you want to update
- Click Edit or upload a new version
- Click Save
Important: The updated knowledge automatically applies to all projects using that tag. You don't need to update each project individually.
Removing a Tag from a Project
To remove access from a single project:
- Go to the project
- Click Project Knowledge
- Find the tag in the Knowledge Tags section
- Remove or deselect the tag
- Click Save
Archiving Outdated Knowledge
To archive knowledge from the entire workspace:
- Go to Workspace Knowledge
- Find the document
- Click Archive
Note: Archiving doesn't delete the document; it just hides it from active use.
Best Practices
Tag Naming Conventions
✓ Good Examples:
brand-guidelineslegal-ukproduct-specs-2024client-acme-campaigntone-of-voice
✗ Bad Examples:
doc1miscstufffile
Tips:
- Use clear, descriptive names that explain the content
- Use hyphens to separate words (not spaces or underscores)
- Tag by purpose, not by file name
- Consider including client names, regions, or dates when relevant
- Keep a consistent naming system across your team
Organizing Your Knowledge
- Group related documents: Use the same tag for documents that serve a similar purpose
- Don't over-tag: Only add tags that make sense for how you'll use the knowledge
- Review quarterly: Remove outdated tags and archive old documents to keep your library fresh
- Document your system: Keep a shared list of active tags and their purposes for your team
Activating Tags in Projects
- Only activate what you need: Too many active tags can confuse the AI or slow down processing
- Be specific: If you have both
brand-guidelines-globalandbrand-guidelines-uk, only activate the one relevant to your project - Test your setup: Start a chat in the project and ask the AI what knowledge it has access to — it will report back based on what's activated
Using Agent Instructions
Agent Instructions help guide how the AI interprets and applies your knowledge. Use them to:
- Specify tone or style requirements
- Highlight critical information that must be followed
- Provide context about when to use (or not use) the knowledge
- Set boundaries or limitations
Example:
"This document contains our legal disclaimers for UK markets. Always include the appropriate disclaimer at the end of marketing materials. Do not modify the wording."
Troubleshooting
Problem: AI isn't using my tagged knowledge
Solutions:
- Check that the tag is activated in Project Knowledge for your project
- Verify the document is uploaded and tagged correctly in Workspace Knowledge
- Ensure the document status shows Ready (not Training in Progress)
- Check that you're in the correct workspace
- Start a new chat in the project — Assist 2.0 looks up project knowledge at the beginning of a chat
Problem: Too many documents are being referenced
Solutions:
- Review active tags in Project Knowledge and remove unnecessary ones
- Archive outdated knowledge in Workspace Knowledge
- Use more specific tags to narrow down context
- Split broad tags into more granular ones (e.g., split
marketingintomarketing-emailandmarketing-social)
Problem: I can't find my tag
Solutions:
- Verify you're in the correct workspace
- Check the tag name is spelled correctly (tags are case-sensitive)
- Confirm the document hasn't been archived
- Ensure the knowledge has finished processing (Training in Progress → Ready)
Problem: Updates aren't applying to my project
Solutions:
- Verify the tag is still activated in your project's Project Knowledge settings
- Check that the document was saved successfully in Workspace Knowledge
- Try removing and re-adding the tag in your project
- Clear your browser cache and refresh the page
Permissions & Security
Who Can Manage Knowledge?
- Workspace Knowledge: Can only be managed by Workspace Owners or Admins
- Project Knowledge: Can be managed by Creators within their assigned projects
Security & Privacy
- All tagged knowledge is stored securely within Assist's ISO 27001-certified environment
- Knowledge is never shared externally or used to train public AI models
- Only users with access to your workspace can see your knowledge
- Knowledge is scoped to a single workspace — there is no cross-workspace or org-level sharing, so sensitive information stays where you put it
- Project-level knowledge activation ensures sensitive information is only available where needed
Need Help with Access?
If you're having trouble with permissions or access, contact your Workspace Admin.
Example Workflow
Scenario: You're running a campaign for a client and need brand guidelines, legal disclaimers, and product specs.
At Workspace Level:
- Upload
Brand_Guidelines.pdf→ Tag:brand-guidelines - Upload
Legal_Disclaimers.docx→ Tag:legal-uk - Upload
Product_Specs.pdf→ Tag:product-specs-2024
At Project Level:
- Create a new project: Client Campaign Q1 2024
- Click Project Knowledge → Knowledge Tags
- Select tags:
brand-guidelines,legal-uk,product-specs-2024 - Click Save
Result:
All chats and outputs in this project will now automatically reference the brand guidelines, legal disclaimers, and product specs. When you start a chat, the AI will pick up this knowledge as part of its initial setup — no need to re-upload or manually attach documents.
Quick Reference
|
Action |
Location |
Steps |
|---|---|---|
|
Upload knowledge |
Workspace Knowledge |
Add Knowledge → Upload File → Add tags → Save |
|
Activate tags |
Project Knowledge |
Project Knowledge → Knowledge Tags → Select tags → Save |
|
Update knowledge |
Workspace Knowledge |
Find document → Edit → Save |
|
Remove tag from project |
Project Knowledge |
Project Knowledge → Remove tag → Save |
|
Add knowledge mid-task |
Inside a project chat |
Upload file or paste URL → ask AI to save it as knowledge |
Summary
Tagged Knowledge transforms how you manage AI context in Assist 2.0:
- Upload once at the workspace level
- Tag clearly with descriptive labels
- Activate selectively in each project
- Update automatically across all projects
- Picked up automatically by chats in any project where the tag is active
This creates smarter AI, faster workflows, and better outputs — without the hassle of managing files across multiple projects.
Ready to get started? Head to your Workspace Knowledge and upload your first document.