
Getting Started with Assist 2.0: Your First Few Minutes
Welcome to Assist 2.0! This guide will walk you through everything you need to know to get started and create your first output. The biggest change from the original Assist: you no longer need to navigate menus to find templates or agents - just tell Assist what you want in plain English, and it figures out the rest.
What You'll Learn
In this guide, you'll learn how to:
- Understand your Workspace and where everything lives
- Create your first Project
- Add Knowledge to give Assist context
- Create your first Output using Just Start Talking
- Work with Agents for expert feedback
- Refine and perfect your content
- Share your work with your team
Estimated time: 10 minutes
Step 1: Understanding Your Workspace
Your Workspace is your team's home base - where all your brand knowledge, templates, and agents live. Everything is scoped to your Workspace, so your work stays separate from other teams in your organisation.
How to access your Workspace:
- Click the dropdown menu in the top-left corner
- You'll see your current Workspace name
- Click Library in the left sidebar to access shared Marketplace, Agents, Templates, and Knowledge
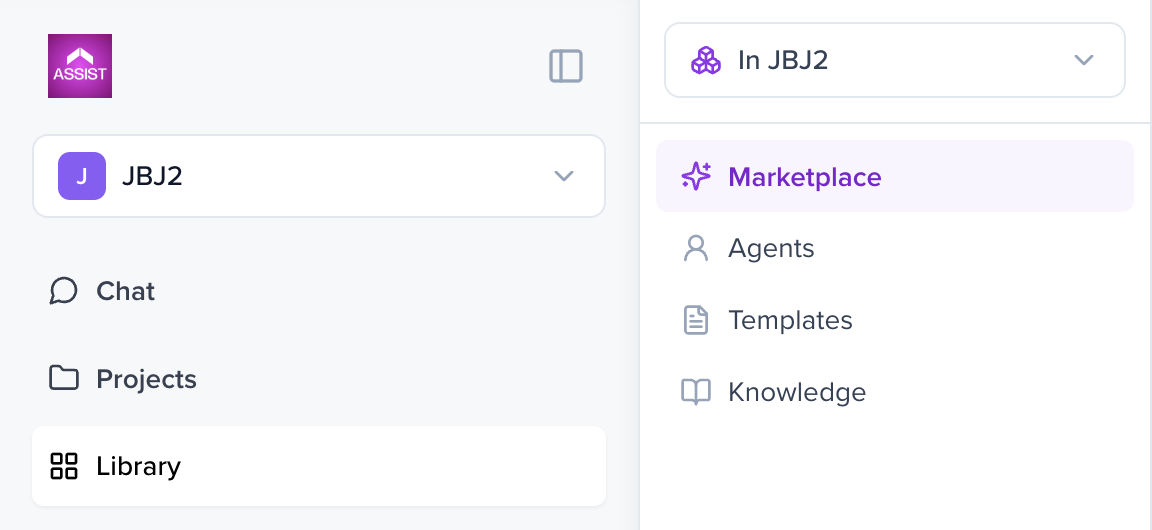
💡 Tip: All team members in your Workspace can access shared knowledge, templates, and agents. Knowledge does not cross between Workspaces.
Step 2: Creating Your First Project
Projects are where you organise specific campaigns, clients, or tasks. They keep your work separate and secure.
How to create a Project:
- Click the "+" button in the left sidebar
- Select "New Project"
- Type your project name (e.g., "My First Campaign")
- Click Create Project
- Your new project will appear in the sidebar
- Click into your project to start working
💡 Tip: Create separate projects for different clients or campaigns to keep everything organised.
Step 3: Adding Project Knowledge
Knowledge gives Assist context about your project. Upload briefs, brand guidelines, research - anything that helps Assist understand what you're working on.
How to add Knowledge:
- Open your project
- Click Project Knowledge in the left sidebar
- Click Add Knowledge → Upload File
- Select your file from your computer
- Wait for the upload to complete
- Your file will appear in the Knowledge list with a green checkmark ✅
💡 Tip: The more context you provide, the better Assist can generate relevant content. Assist 2.0 will automatically search existing Knowledge before creating anything new, so good Knowledge pays off across every output.
Supported file types: PDF, DOCX, TXT, and more
Step 4: Creating Your First Output — Just Start Talking
This is where Assist 2.0 is different. You don't need to browse a template gallery or pick the right agent up front. Just describe what you want in the chat, and Assist will plan the work, pick or create the right template, pull in the right agents, and generate your output.
How to create an Output:
- Inside your project, click into the chat input at the bottom
-
Describe what you want in natural language. For example:
"Create a creative brief for a sustainable fashion campaign targeting Gen Z."
- Press Enter or click Send
- Assist will show you what it's planning - the template it'll use (or create), any agents it'll involve, and the outputs it'll generate
- Review the plan, then accept it (or revise it first - see below)
- Watch as Assist generates your content on the canvas
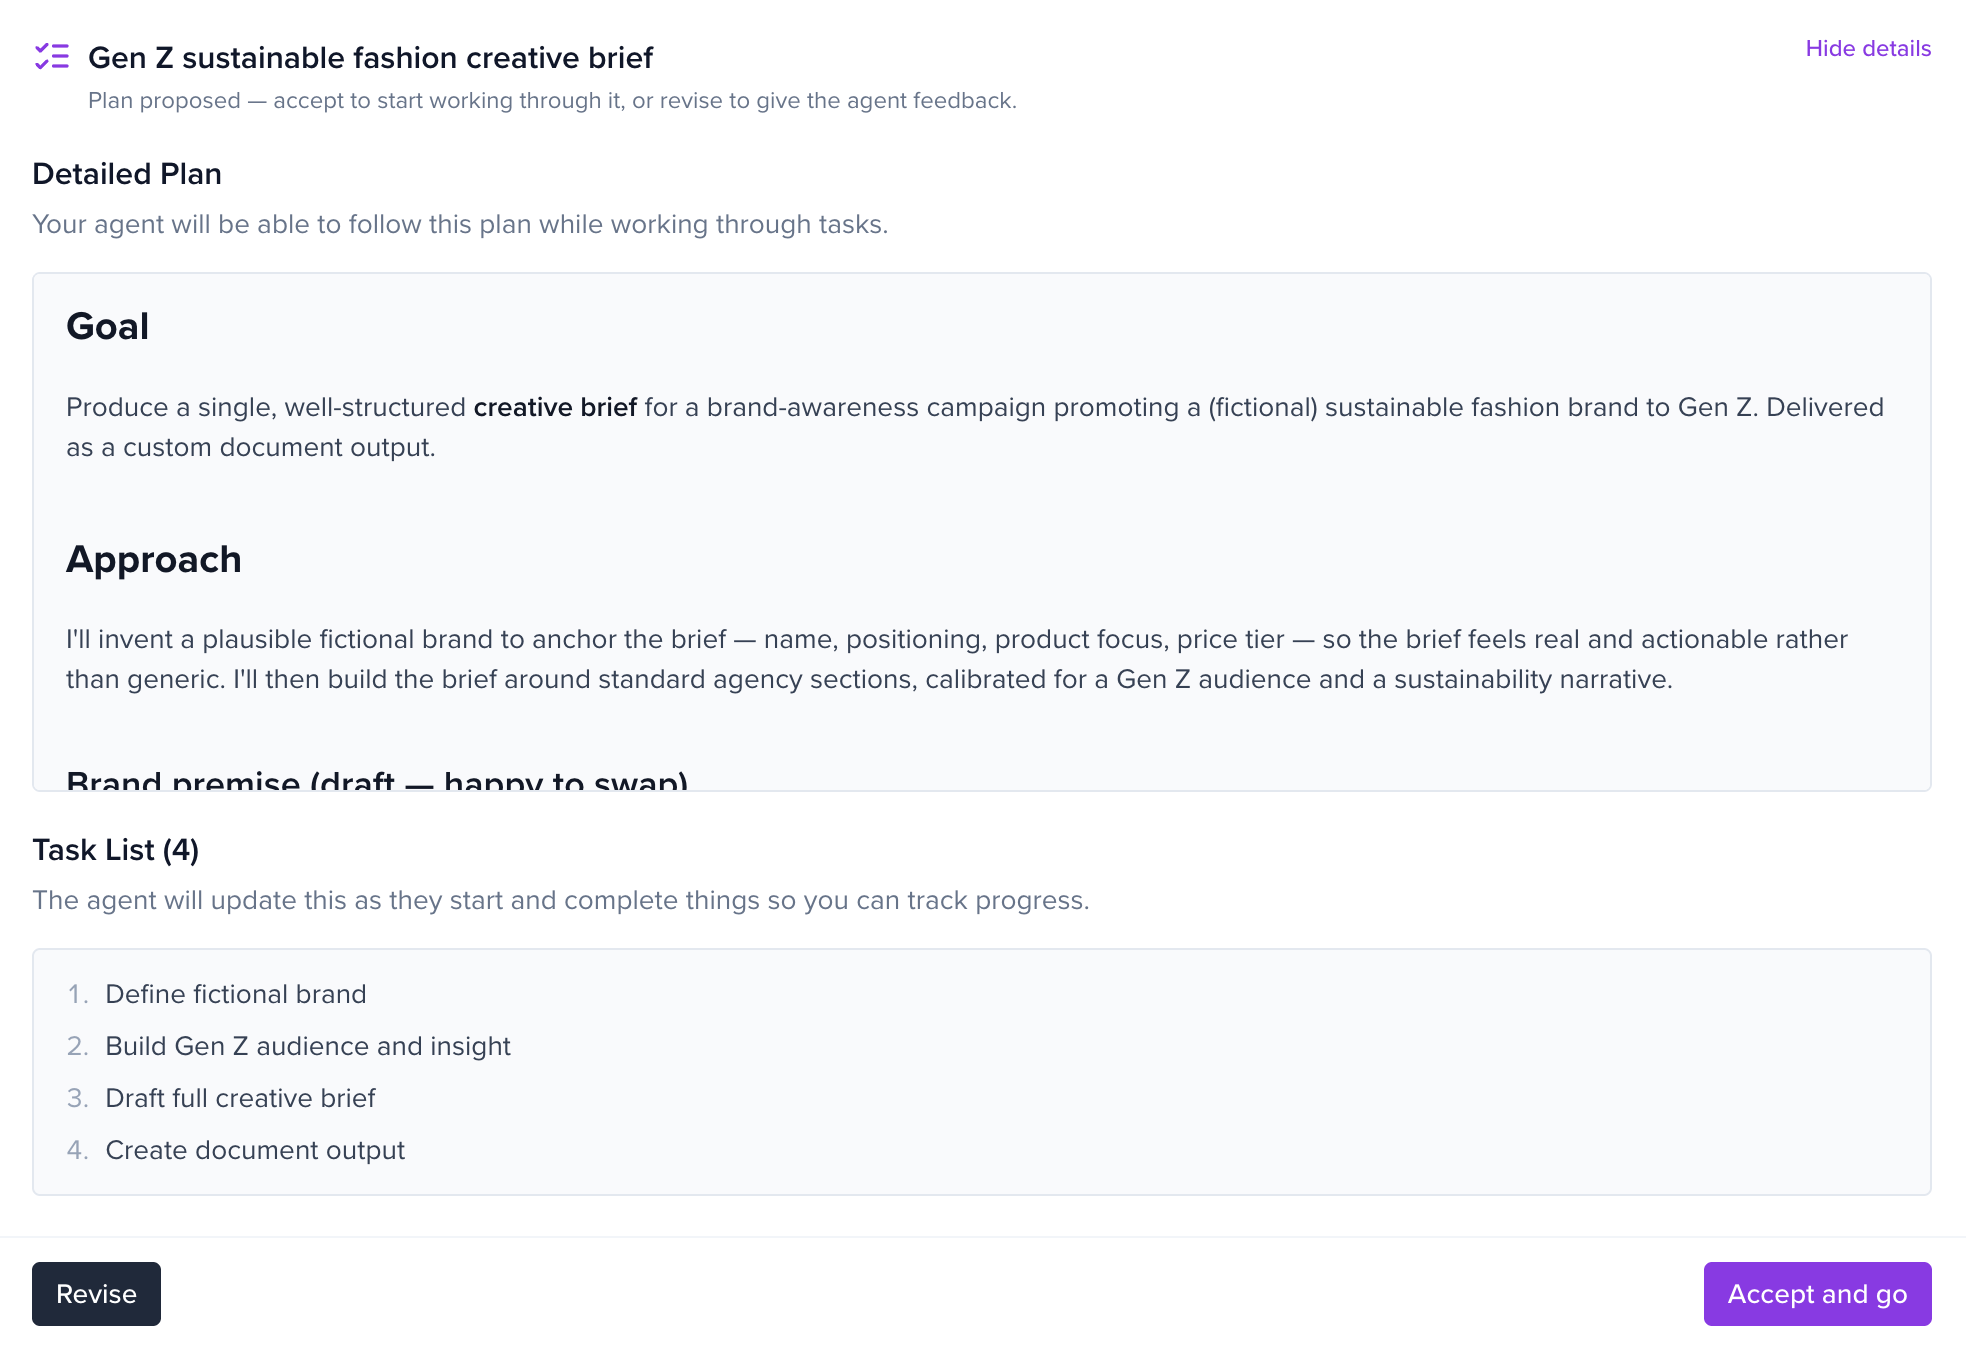
💡 Tip: If a suitable template already exists in your Workspace or the Marketplace, Assist will reuse it rather than creating a duplicate. You don't need to hunt for it.
Plan Mode vs Execute Mode
- Execute Mode (default for simple requests): Assist gets on with it immediately.
- Plan Mode: Assist proposes a plan first and waits for you to accept or revise before doing anything. Useful for bigger or more sensitive tasks.
You can switch modes from the chat input.
Step 5: Working with Agents
Agents are AI specialists — Marketing Strategists, Research Agents, PR Experts, and more. In Assist 2.0, you usually don't need to summon them manually. If your request needs expert input, Assist will pull in the right agent automatically.
If you want to call one directly:
- Type "@" in the chat
- Pick an agent from the menu (only agents you have access to will appear)
- Type your message (e.g., "Review this brief for Gen Z appeal")
- Press Enter
You can see all available agents and install new ones from Library → Agents or the Marketplace.
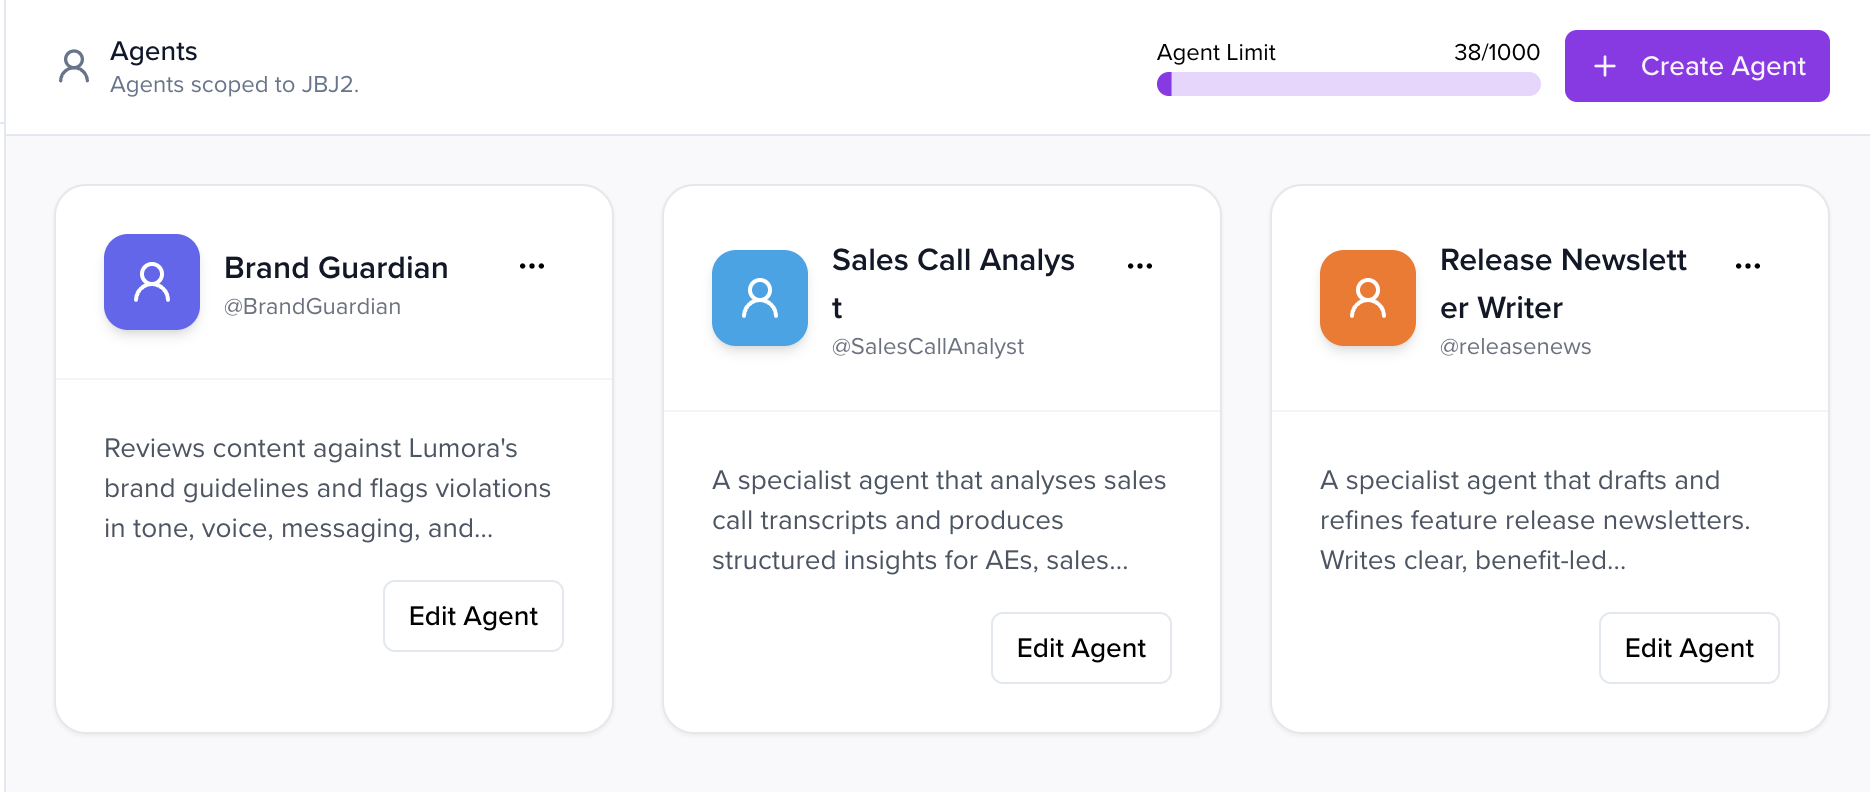
💡 Tip: Each Workspace has an Agent Limit shown at the top of the Agents tab. Check it before installing or creating new agents.
Step 6: Refining Your Content
Not quite right? Just ask Assist to refine your content in the same chat - no need to start over.
How to refine content:
- Click in the chat input
- Type your refinement request (e.g., "Make the tone more playful and add a sustainability angle")
- Press Enter
- Watch as Assist updates the content on the canvas
- Keep refining until it's right
💡 Tip: Be specific. "Make the second paragraph punchier and cut the corporate jargon" beats "make it better." During work, you'll see Assist's tool and thinking activity live; once it's done, that activity collapses behind an expander so the final output is front and centre.
Step 7: Sharing Your Work
Ready to collaborate? Share your Output with team members or clients and control who can view or edit.
How to share an Output:
- Click the Share button (top-right corner)
- In the share modal, click the Invite people field
- Type the email address of the person you want to invite
- Click the permission dropdown and select:
- Can View - Read-only access
- Can Comment - Can add comments but not edit
- Can Edit - Full editing access
- Click Send Invite
💡 Tip: You can change permissions at any time by returning to the share settings.
You're Ready to Go! 🚀
Congratulations! You've learned how to:
- ✅ Navigate your Workspace and Library
- ✅ Create Projects
- ✅ Upload Knowledge
- ✅ Generate Outputs by Just Start Talking
- ✅ Work with Agents
- ✅ Refine content
- ✅ Share with your team
You're now ready to start creating with Assist 2.0.
Next Steps
- Try more ambitious prompts - Assist 2.0 can create templates and agents on the fly
- Upload additional Knowledge to improve context across every output
- Explore the Marketplace in your Library for pre-built templates and agents
- Invite your team to collaborate on projects
Need Help?
If you have questions or need assistance:
- Contact your Workspace admin
- Reach out to our support team
- Check out our other help articles
Welcome to Assist 2.0 - we're excited to see what you create!